
Configure and purchase the server
There are many cloud server vendors, users could pick up their preferred provider for using. For configuration, "8 VCPUs, 60G memory, one P100 GPU, 440G storage space (temporary storage), and Intel Xeon E5-2682V4 CPU" is recommended. The configuration is sufficient for most tasks.
Next, set up the mirror.
Mirroring recommendation 1: Perform the configuration as shown in the following figure. CentOS/Ubuntu16.04 system support "automatic installation of GPU driver" (novice recommended to use Ubuntu16.04, encountered a little less pit), you can avoid later steps to install the GPU driver. (If using Tensorflow, you still need to manually install cuDNN.)
The underlying support for TensorFlow-Gpus changes all the time. Tensorflow-gpu release currently (March 20, 2019) requires CUDA 9.0 (9.1 not currently supported!) The Driver must be 384.x or later. If you read this article several years later, please check the GPU driver version requirements of TensorFlow-GPU. Tensorflow-gpu cannot run if the driver version is not correct.
In XRCLOUD.NET, when billing by volume, if user want to stop billing, just shut down the server, not delete the server. In the future, if you want to use the server, you can restart it again. You do not need to configure and purchase the server again.
Server connection
In the console we can see the cloud server we are running. Remember the public IP address of our server.
Here we take Xshell as an example to connect to a remote server. Open Xshell and select "File" - "New" from the menu bar.
Set host to the public IP address, SSH protocol, and port 22 of the server you purchased.
There will be an SSH security warning when you log in for the first time. Just select "Receive and save".
This is followed by user login, with the default user name of the Linux system is the root, and the default user name of the Windows system is administrator.
Environment installation
The newly purchased cloud server has only the simplest configuration. We need to install some deep learning environment on top of this. There are a lot of problems in different environments, and it is difficult to list them here. If there is a problem when the reader installs please Google it.
Installing the GPU driver, CUDA, and cuDNN
Use Jupyter to operate the server
We can tunnel through Xshell, which allows us to control the remote server by browsing Jupyter locally.
configuration jupyter
PIP install Jupyter on the remote server
Next, type Jupyter notebook -- generate-config -- allow-root to generate the configuration file.
We enter Python to enter the Python execution interface. Input:
from notebook.auth import passwd
passwd()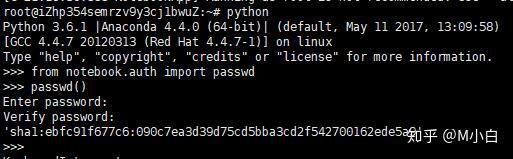
Then the system will ask us to enter and verify a new password, which is easy to remember. When the input is complete, we are returned with an encrypted string, which we copy.
Press CTRL + Z to return to the CLI and enter vi ~/. Jupyter /jupyter_notebook_config.py to edit the file.
Press the "I" key to enter the insert mode and insert the following content:
c.NotebookApp.ip='*'
c.NotebookApp.password = u'sha1'
c.NotebookApp.open_browser = False
c.NotebookApp.port =8888 # 
Press 'Esc' to exit insert mode, enter :wq and press Enter to preserve and close the file.
At this point, enter Jupyter notebook -allow-root server is running Jupyter, but to access locally, we need to let Cloud Server open port 8888
Tunnel connection
In the session manager on the left side of the Xshell interface, select Properties
Click "Tunnel" - "Add"
Enter the following information to listen on any port (5000) : The destination host does not need to be set. The destination port is the port number set earlier by c. notebookapp. port =8888.
Click OK when you're done. Disconnect and reconnect to the server.
After running JUPyter. We can now access the remote server by accessing port 5000 locally.


No comments